SpARF - The modular strip fixture

Strip light questions and discussions go here (Samsung, Bridgelux, Photo Boost, Growcraft, etc.)
YYCannabis
LED Enthusiast
LED Enthusiast
Reactions:
Posts: 86
Joined: Tue Aug 13, 2019 11:50 pm

These are moveable/removable ribs 😁 The problem right now that makes moving them a challenge is the solid core wire I used (better for DC current). I’m also weighing out if I want all the wires coming to the ends. When I make V2 I might explore having the wires gather towards the middle of the fixture and go straight up, then over to the edge of the tent.

Here’s some pics from early in the build (before electrical) showing how the ribs can be moved to suit the needs of the space.
14AE4C03-AB9F-4203-AF18-5465D1B9B3BD.jpeg
8FBC9623-E84C-4178-9AB5-FBF9C1E9DB29.jpeg
88A1C425-491C-40FA-9CCC-612620BFB827.jpeg
As you can see that there is plenty of open spaces between ribs where new ribs could be placed with accessory spectrum emitters like far-red and/or UV...or just more white strips 😁

Cheers
YYC
Nuggie
LED Maniac
LED Maniac
Reactions:
Posts: 281
Joined: Fri Mar 15, 2019 4:28 pm

To make the solid core wires flexible you'd have to make them long enough to accommodate spreading them out, in other words a switchback loop to give it flexibility. Not sure that looks clean but it's more functional that way. Nice light!
If your aunt had balls she'd be your uncle.
YYCannabis
LED Enthusiast
LED Enthusiast
Reactions:
Posts: 86
Joined: Tue Aug 13, 2019 11:50 pm

Thought I’d show some results from these lights.

As you can see, these have yielded some incredible results.

I’ll note that I am a licensed medical grower in Canada with legal recreational laws.
Attachments
64378ED4-D619-4B9E-9E80-C052607FC199.jpeg
435433E3-51AE-4D61-A324-6D4FF02E51C2.jpeg
0EB2D585-61D8-4D98-9F6F-BBB147ED772E.jpeg
17C937CC-CE9D-4B70-BD14-E3F2C4240BF5.jpeg
267D20F3-5881-4863-8EDA-D3BFB683E8C1.jpeg
86DE5F0C-6A70-444D-92EC-094C9BC5069B.jpeg
680CB1E3-7992-4EDC-82D4-FEEFBAED45BB.jpeg
B81E2A3B-FC29-4947-80E7-F9113DB2F102.jpeg
3904412D-6FD5-41E8-9BBB-BE6C674E49F5.jpeg
FCCB78C6-611B-4758-9547-D262ACF91FDD.jpeg
User avatar
TEKNIK
LED Wizard
LED Wizard
Reactions:
Posts: 1435
Joined: Fri May 03, 2019 7:53 pm

Nice results there, good job all round with the fixture build.
I do have one question, how often are you sliding the strips around to make adjustments now you have been using it for a while?
Find me on Instagram led_teknik
YYCannabis
LED Enthusiast
LED Enthusiast
Reactions:
Posts: 86
Joined: Tue Aug 13, 2019 11:50 pm

I moved them 4 times along the spine. First two was part of the “figure this out” learning at the beginning.
Then when my tent went from 3 plants to only two plants, I made two more adjustments. But the reality is, the movements were only inches.

Since building these lights, I have been learning what is the balance between what the lights can do and how are the plants responding. And as you can see from the results, I must have been keeping in a pretty sweet spot for growth.

My plants are autos, so they didn’t need forcing into flower and I ran these lights on an 18/6 cycle.

I ran the 5000k at 100% for the duration of veg. The 3000k were at approx 40% power during early veg then slowly turned higher over a couple of weeks until they were at 100% as well. That totaled 600w.

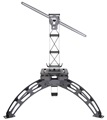
I kept BOTH spectrums at 100% for flowering up until the plants looked like they were 2 weeks away from harvest. At that time I turned the 5000k down to about 60% then to 40% for the last week...approx only 450w. In the pics, when I had the lights in a teepee (A-frame) setup the plants exploded with bud sites. I defoliated the upper 2/3 of the fan leaves (fan leaves at branch tips were untouched)so the light would reach right to the main plant stalk 😎. The thc output on the small popcorn buds is amazing since they could get photons beyond what direct overhead lighting could ever provide. I left a hula skirt of fan leaves around the bottom 1/3 of the plant.

You can see the hula skirt of leaves in this pic. This was about 3 weeks before harvest.
D5664509-0249-4811-92BC-198B536DC2EB.jpeg
And here is a pic looking into the heart of a plant and how much crystal was generated. Camera flash helps to highlight crystals.
DCE2B0E5-D191-4185-AF7D-3A67C2AC9803.jpeg
Going forward, I’m going to add more of the 3000k, or warmer, strips and possibly some far-red. The last stage of flowering at only 450w needs to be improved. Also going to cut the 4’ spines to 2’ lengths for better adjusting to different size plants.

The pitfalls of the A-frame setup is the extra space it uses and I needed to rotate the plants everyday to keep growth/development even.
User avatar
TEKNIK
LED Wizard
LED Wizard
Reactions:
Posts: 1435
Joined: Fri May 03, 2019 7:53 pm

Great job, I have some guys trying out some side light and under canopy lights of mine to see how much of a difference it will make, I think it will be a bit of a learning curve.
With autos it's definitely better to have the plants surrounded in light as you can't shape them the same way as photos.
Find me on Instagram led_teknik
Nuggie
LED Maniac
LED Maniac
Reactions:
Posts: 281
Joined: Fri Mar 15, 2019 4:28 pm

Nice setup, the only concern I have would be the light at the peak not hitting the plants, but it looks like the results speak louder than me. I am building side lighting as well but going with the normal horiz overhead and then placing strips on all four sides about 1/3 The way down from top of canopy. Not sure how it's going to go, test will show results.
If your aunt had balls she'd be your uncle.
YYCannabis
LED Enthusiast
LED Enthusiast
Reactions:
Posts: 86
Joined: Tue Aug 13, 2019 11:50 pm

Light waste is unavoidable in my situation but that is because I run lower power and was trying to keep the strips ~8” from the plants. If the plants were taller, light waste would have been reduced. 😉 Strips at 12” vs the 22” ones I have would make things even more controllable to reduce light waste plus increase plant exposure.

I’m contemplating building another light that is more like a birdcage. Challenge is how to design so it can easily size up as the plant grows, both vertical and horizontal. Plus be able to easily access the plant.

Once I saw the type of growth that’s possible with strips my inner enginerd starting designing all different types of frames. 🤣

Strips are the future of indoor growing. No doubt about it.
YYCannabis
LED Enthusiast
LED Enthusiast
Reactions:
Posts: 86
Joined: Tue Aug 13, 2019 11:50 pm

I also want to point out the fact that the strips are not at any kind of calculated distance apart from each other... I placed them using the “that-looks-good” methodology. Damn be the folk who think they need some “photon placement perfect” design. 😂😎
User avatar
TEKNIK
LED Wizard
LED Wizard
Reactions:
Posts: 1435
Joined: Fri May 03, 2019 7:53 pm

I know you went to alot of trouble to put the sliding system in so you can adjust them to exactly where you want them to be. That's why I asked the question. I don't think it's worth it in the end, the way you have done the flexible design is awesome though. Great job and I am looking forward to the next build you do.
Find me on Instagram led_teknik
Post Reply